
Mycelarium Growth Mechanics Explained
How Mycelarium growth works: the aim preview, water cost per centimetre, node cost, soil rules and the upgrades that change the maths.
Every Mycelarium run is a sequence of growth decisions, and every decision has a visible price. The aim line shows the centimetres you will add and the water you will spend. The HUD shows the food available for new nodes. Once you understand those two numbers, the upgrade tree stops being a list of vague bonuses and becomes a set of levers on the exchange rate.
This page covers the confirmed mechanics, the parts that are still being tested by the community, and the practical rules that follow from both.
What happens when you grow?
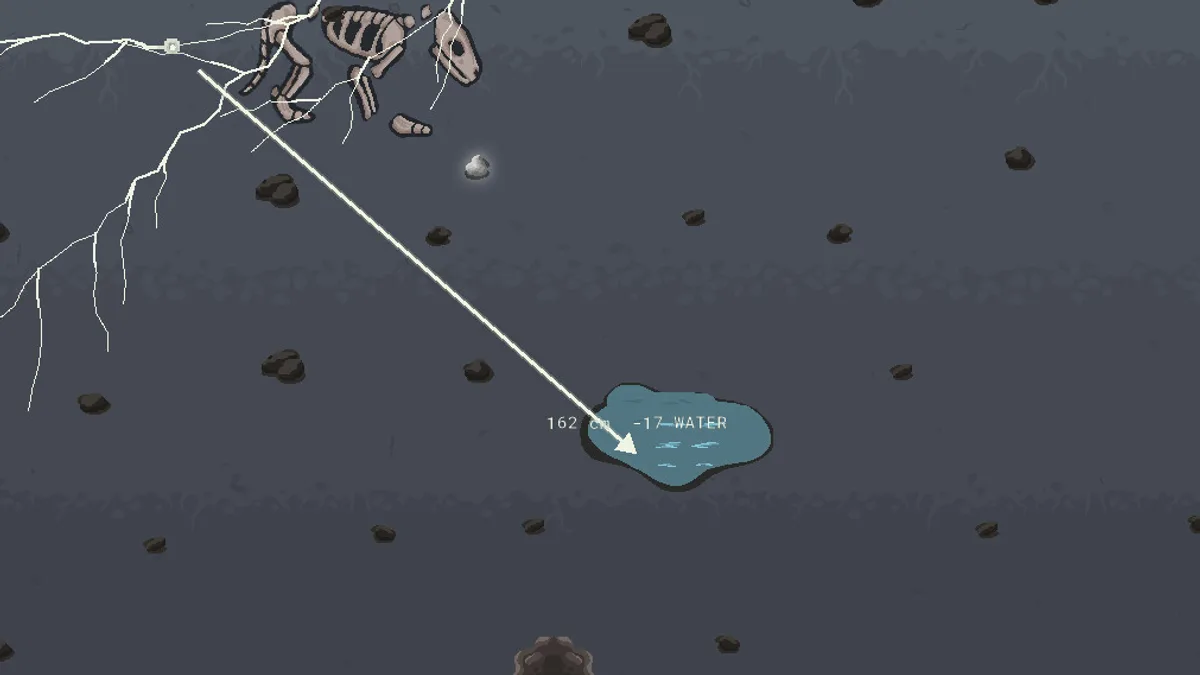
You pick an existing node, drag toward a target, and release. The network extends along the line, placing new nodes at intervals. The shot adds its length to the cm counter at the top of the screen and subtracts its water cost from the droplet counter.
The preview is exact for the current shot. In the screenshots from a developed save, the line reads 162 cm -17 WATER in one place and 250 cm -13 WATER in another. The second shot is longer and cheaper, which shows that the ratio depends on the terrain and on your upgrades, not just on distance.
Two limits stop a shot: hard soil and stone. The preview shortens or refuses when the line crosses them. Soil Penetration is the upgrade that lets you cross harder ground, and it is the main gate on deeper layers.
Why do longer shots cost proportionally less?
They do not always. The water cost depends on the ground the shot crosses, the current water efficiency, and the length. A long shot through soft dirt can be cheaper per centimetre than three short shots through the same dirt, because each shot has a fixed overhead.
The practical rule is to compare ratios, not totals. If the preview says 250 cm for 13 water, that is about 19 cm per water. If it says 162 cm for 17 water, that is about 9.5 cm per water. The first is more than twice as efficient, and the difference compounds over a session.
Water efficiency improves both numbers, which is why it is the safest early upgrade. It does not change what you can reach; it changes how much reaching costs.
What is the difference between a node and a mushroom?
Nodes are the network. They are the points you click to grow, and they carry the mycelium. Mushrooms are structures built on nodes: Predator, Water, Stinky, Repeller, Digger, Consumptor, Spore and Experience. Nodes cost food to add; mushrooms cost food (and sometimes water) to build and may cost maintenance in attention.
The distinction matters because the HUD does not separate the two. When food is empty, both stop. When water is empty, growth stops but existing mushrooms keep working.
Players report that growth during rain costs no water. The exact rule is worth testing, but the safe habit is to save long exploratory shots for rain and use dry weather for short, precise connections.
Which upgrades change growth?
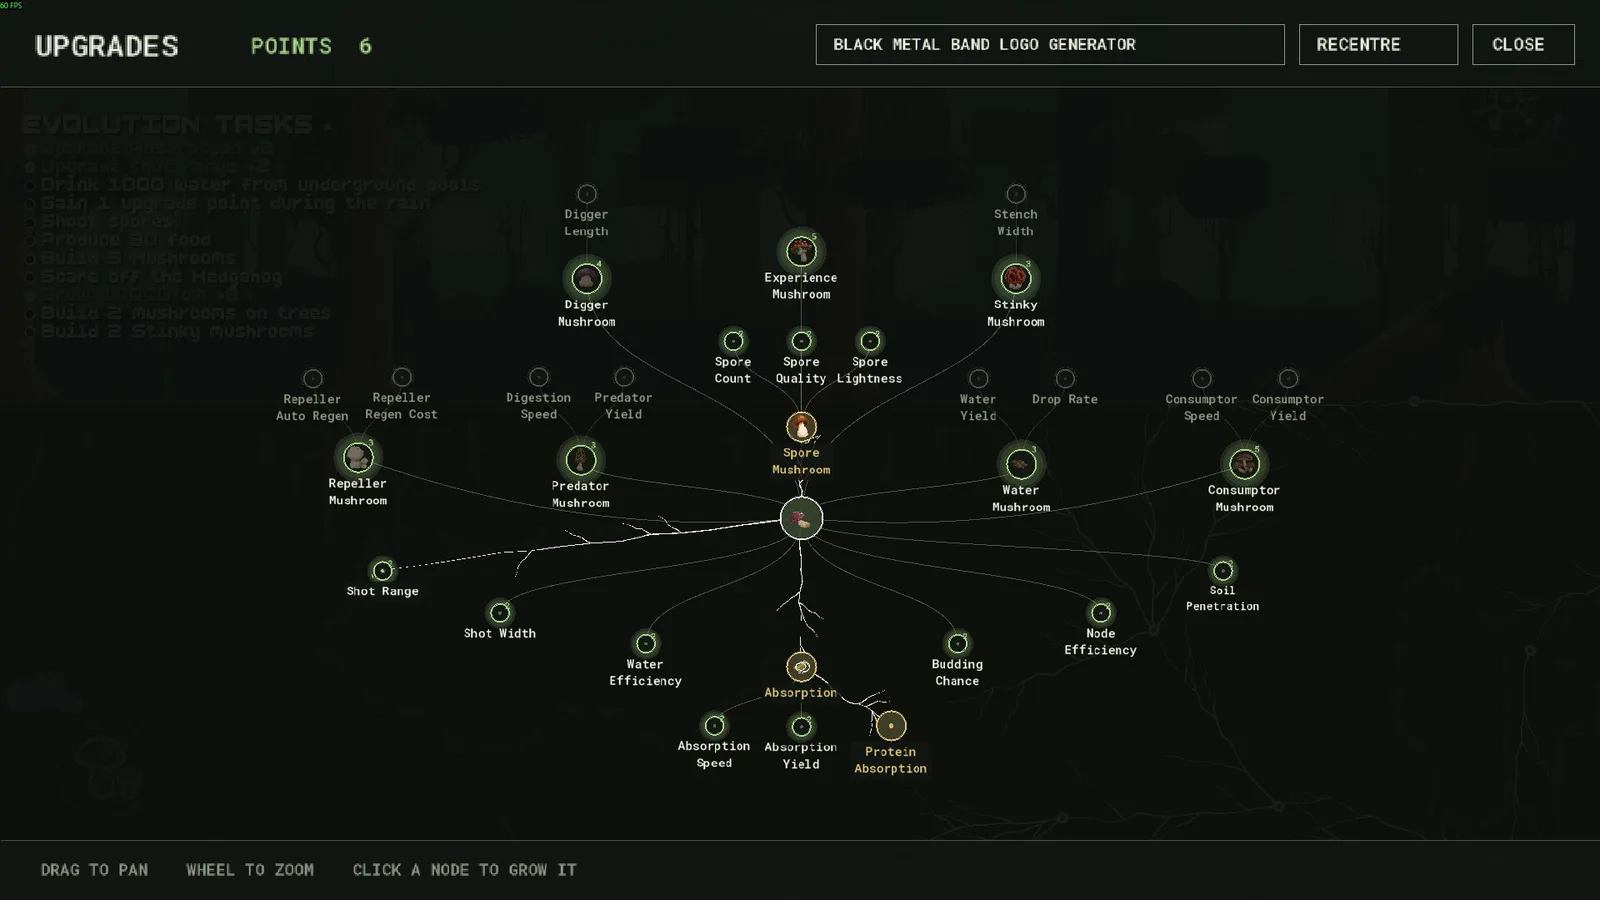
The upgrade tree groups its nodes into a few families. The growth-facing ones are:
- Shot Range — how far a single shot can reach.
- Shot Width — how wide the grown path is. The exact effect on node count needs testing, but players treat it as a way to build denser corridors.
- Water Efficiency — water cost per centimetre.
- Budding Chance — the chance of an extra branch or node appearing during growth.
- Node Efficiency — the food cost of nodes.
- Soil Penetration — the ability to cross harder soil and stone.
Everything else in the tree modifies a mushroom: Predator Yield, Water Yield, Stench Width, Spore Count, Digger Length and so on. Those are multipliers on systems, not on the base growth maths. The upgrade priority guide→ ranks the whole tree by phase.
Does length really give experience?
The community consensus is yes: total network length is the experience track, and the diamond counter is the points you spend in the tree. The five growth achievements use the same unit, from 1,000 cm to 1,000,000 cm, which reinforces that length is the game's primary measure of progress.
Evolution tasks pay bonus points on top. In a developed save the task panel shows rewards such as +2 next to completed objectives, and tasks like Grow 10000 cm or Drink 1000 water from underground pools. The progression guide→ lists the tasks visible in the screenshots and explains how to farm them without grinding.
How does soil change the plan?
The surface is soft. Below it, the layers alternate between diggable dirt and obstacles:
- Brown Dirt, the first layer, is reachable with early penetration.
- Grey Dirt, the second, is separated by stone mazes and harder ground.
- Red Dirt, the third, sits below another barrier and holds the deepest magic shroom.
Stone does not damage the network; it simply blocks the line. The correct response is to look for a gap, not to buy more penetration than you need. A single point in Soil Penetration often opens a route that looks impossible from the surface.
What is still unverified?
Three details need testing before they can be stated as fact:
- The exact formula behind the water cost preview.
- Whether Shot Width changes node density or only the visual thickness.
- Whether rain removes all water costs or only the growth component.
The safe approach is to treat the preview as ground truth and the formulas as approximations. The FAQ→ collects the questions that the current build does not answer cleanly.
FAQ
Does growing always cost water?
In dry weather, yes. Rain appears to remove the water cost, which is why players time long shots around it.
What does the cm counter measure?
Total mycelium length. It is both the score and the experience track that feeds upgrade points.
Why does a shot stop before the cursor?
Hard soil or stone is in the way, or the shot has reached its range limit. Improve Soil Penetration or Shot Range.
Do nodes expire?
No. The network persists; only mushrooms can be lost to animals or removed by the player.
Official source: Mycelarium on Steam ↗ Official source: Update 1.02 notes ↗
The Steam discussions hub ↗ has player measurements of shot costs, and the achievement page ↗ confirms the centimetre thresholds used by the growth milestones.